


As an embedded engineer, I often need to practice Linux programming on my Windows laptop. I believe that installing a distro directly into the system is superfluous and somewhat complex.
I have since discovered WSL, which is more practical. Thus, I make a few notes about how to configure the system to run and build code.
This is for people who already know how to do it but struggle to make it work.
1. Use virtual machine
Firstly, I remind everyone about the old-school method with VM
You need Virtual machine with an Ubuntu distro. I choose Kubuntu because I think it is less prone to errors than Ubuntu (just my personal experience).
Install ssh to Ubuntu, then enable it
The most important part is setting up Network in VM
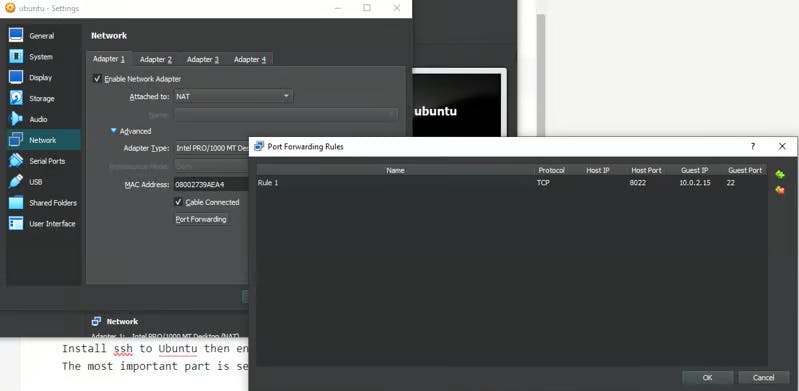
The guess IP is the IP in Ubuntu you get from the ifconfig command.
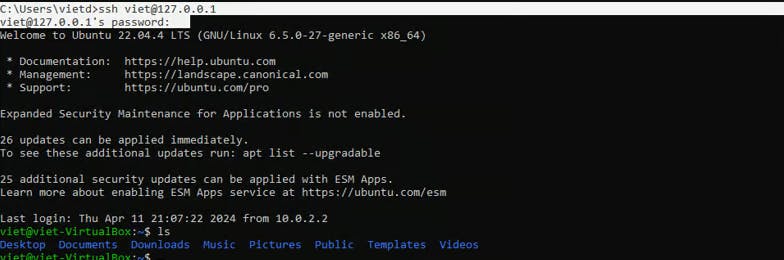
You can test the connection in command window
Now open VSCode or Visual Studio, install the SSH extension, and create a new one. Use the same command as above, and you are good to write code.
2. Use WSL
WSL stands for Windows Subsystem for Linux. In short, it works like below:

This is the best tutorial on how to install WSL and connect it with VSCode. Just follow it.
Now that you can access a Linux system using WSL, we come to the most important part: compile and run/debug source code.
You need to create a Hello World.cpp file inside WSL to test.
We need tasks.json file to compile the code in Linux and a launch.json file to debug.
You can search these files using Ctrl Shift P command
tasks.json
{
    "version": "2.0.0",
    "tasks": [
        {
            "type": "cppbuild",
            "label": "C/C++: g++ build active file",
            "command": "/usr/bin/g++",
            "args": [
                "-fdiagnostics-color=always",
                "-g",
                "${file}",
                "-o",
                "${fileDirname}/${fileBasenameNoExtension}"
            ],
            "options": {
                "cwd": "${fileDirname}"
            },
            "problemMatcher": [
                "$gcc"
            ],
            "group": "build",
            "detail": "compiler: /usr/bin/g++"
        }
    ]
}
Install gdb to Linux using command
sudo apt install gdb
Now check where gdb is

Configure launch.json file and update miDebuggerPath with the path you get
{
    // Use IntelliSense to learn about possible attributes.
    // Hover to view descriptions of existing attributes.
    // For more information, visit: https://go.microsoft.com/fwlink/?linkid=830387
    "version": "0.2.0",
    "configurations": [
        {
            "name": "debug",
            "type": "cppdbg",
            "request": "launch",
            "program": "${fileDirname}/${fileBasenameNoExtension}",
            "MIMode": "gdb",
            "cwd": "${fileDirname}",
            "miDebuggerPath": "/usr/bin/gdb",
            "setupCommands": [
                {
                    "description": "Enable pretty-printing for gdb",
                    "text": "-enable-pretty-printing",
                    "ignoreFailures": true
                },
                {
                    "description": "Set Disassembly Flavor to Intel",
                    "text": "-gdb-set disassembly-flavor intel",
                    "ignoreFailures": true
                }
            ],
            "preLaunchTask": "C/C++: g++ build active file"
        }
    ]
}
To compile code, use Ctrl Shift B

To debug, use Run > Start Debugging

Everything should be okay now. Enjoy!